LABORATORY: CNR-ISPC
NAME OF THE INSTRUMENT
Total Reflection/Grazing Incidence X-Ray Fluorescence spectroscopy developed at XRAYLab of CNR-ISPC
GENERAL DESCRIPTION
Total reflection or grazing incidence XRF (T-XRF/GI-XRF) is a not destructive analytical method which enables the isolation of surface layers of the sample studied. The experimental set up of the instrument is extremely versatile and allows to modify the geometry of the XRF experiment according to the characteristics of the sample and / or of the diagnostic question. The T-XRF configuration exploits the properties of totally reflected X-Rays to extract information about the chemical composition of the surface and is only suitable for samples with flat and smooth surfaces. Changing the angle of incidence probes different depths of the sample (GI-XRF configuration) and gives access to the chemical composition of both surface and buried layers, also for samples with irregular and not reflecting surfaces.
The T-XRF/GI-XRF technique is non-destructive, it can be applied in situ, and it is indicated for all those applications in which elemental analysis of materials (typically inorganic) is aimed at studies of provenance, nature of materials and their state of conservation (search of chemical elements associations), manufacturing technique or artistic process. The method is also particularly suited to the study of stratified materials and the search for trace contaminants and inclusions.
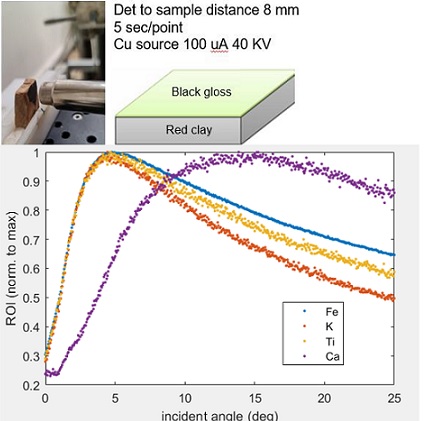
The T-XRF configuration exploits the confinement of the electromagnetic field of the incoming radiation, which doesn’t penetrate the sample and thus only excites the atoms along the sample surface. In this fashion the surface XRF signal is isolated. Therefore, surface glazing can be studied separately from the objects’ core, for example. To obtain instead information about buried layers of the samples it is necessary to allow the radiation to penetrate beyond the surface, by increasing the angle of incidence. The stratigraphy of the samples can be derived from the relationship between penetration depth and angle of incidence of X-Rays, with larger angles corresponding to deeper penetration. Collecting the angular scanning of the XRF signal (GI-XRF) therefore allows to discriminate the chemical composition of different layers. Acquisition times strongly depend on the sample under study as well and the diagnostic question. To search for contaminants (in the ppb range) it could be necessary to accumulate for longer than 1h per single measurement. To determine the stratigraphy distribution of a sample (with thicknesses in the micron range) it could be sufficient to operate an angular scanning of few minutes per point.
Synthetic guide for choosing the TXRF/GI-XRF method of ISPC-CNR
Materials: inorganic materials with regular (smooth) and/or reflecting surface.
Optimal application: small paintings, metals, painted or glazed ceramics, glasses and obsidians.
Sample positioning: vertical.
Type of analysis: non-destructive and in-situ
Measuring times: variable, depending on both type of sample and diagnostic question. Stratigraphy: around 10 minutes per point. Ultra-trace element search: around 50 minutes per point.
Maximum resolution: nanometer (stratigraphy)
Limits of detection: 0.1 part per million.
Characteristics and parameters of the X source: a) high brilliance monochromatic Ag Ka source, 50kV e 0.88mA (44W power); b) high brilliance monochromatic Cu Ka source, 50kV 0.88mA.
Beam size: 660 microns with the Ag source, 180 microns with the Cu source.
Detection system: SDD detector with resolution 120 eV@5.9keV.
Other methods available: XRD in transmission geometry, GE-XRF, XRF.
TECHNICAL DESCRIPTION
The T-XRF/ GI-XRF spectrometer of ISPC-CNR is equipped with two different X-Rays sources, one with a copper anode and the other with a silver anode. Both sources are high brilliance and monochromatized via double diffraction mirrors (Montel optics) to select the K-alpha anode emission. The produced beam is slightly convergent, with a diameter at the focus of 180 microns, for the Cu source and parallel, with a side of 660 microns, for the Ag source. The flux of the two sources also considerably differs, with the copper source being 100 times more brilliant than the silver one. Therefore, for light elements (from silicium to cobalt K lines), it is more advantageous to use the copper tube, while the silver tube is used to study heavier elements. The fluorescence is collected by an SDD with active area of 25 mm2 (collimated down to 17 mm2thickness of 450 micron and protected by a beryllium window of thickness 8 micron. The energy resolution is 120 eV at the manganese K-alpha line (5.9 KeV) and the counting rate is higher than 1Mcps. The alignment and scanning of the sample are performed by linear and rotational motorized axes. The two motorized high precision rotational axes available, with step in the millideg range, are controlled by a CPU and allow independent orientation of both the sample surface and the detector axis with respect to the beam direction. The linear axes are used to precisely position the sample with respect to the beam. An X-Ray camera is used to visualize the beam and monitor the alignment operations.
Referent:
Paolo Romano francescopaolo.romano@cnr.it
