LABORATORY: CNR ISPC
NAME OF THE INSTRUMENT
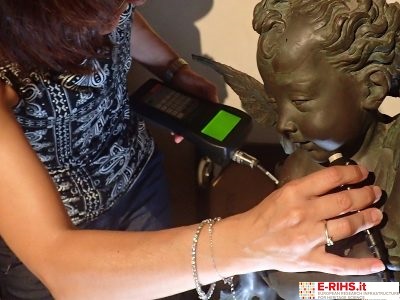
Portable Eddy current device for electrical conductivity measurement of nonferrous metals: SIGMASCOPE mod. SMP350
GENERAL DESCRIPTION
La conducibilità elettrica è un’importante proprietà dei metalli correlabile alla composizione, alla microstruttura e alle proprietà meccaniche.
The electrical conductivity is an important material property that not only informs about how well a metal conducts electrical current but also provides information about its composition, structure, or mechanical properties.
In the field of Cultural Heritage, the measurement of metal conductivity can be useful to verify the homogeneity of artistic alloys (bronze, brass, ...) and to detect compositional differences between sculptural parts. For example, additions, repairs, dowels, pins can be identified and compared, even under the patina of alteration and therefore not immediately evident on visual inspection.
The instrument supplied measures the electrical conductivity using the eddy current (EC) method, with a dedicated probe, according to Standards ASTM E1004 and DIN EN 2004-1. The signal evaluation enables a totally non-invasive and fast determination of the electrical conductivity, for example, under paint or synthetic coatings of up to 500 μm in thickness. This also minimizes the influence of surface roughness.
Furthermore, the use of the EC probe allows a capillary exploration of the surfaces thus obtaining a mapping which, together with the autopsy observation, allows selecting the most representative measurement points for subsequent punctual analyzes (eg. XRF, LIBS,…).
A particularly advantageous application of the EC technique involves integration with portable XRF spectroscopy. In fact, in the presence of thick patinas such as archaeological ones, the coupling of these two techniques allows maximizingthe obtainable information both in terms of homogeneity of the alloy and of composition.
TECHNICAL DESCRIPTION
The SIGMASCOPE SMP350 instrument operates in the measurement range 0.3 - 63 MS/m or 0.5 - 108% IACS, with accuracy of ± 0.5% at ambient temperature. With FS40 probe, the measurement frequencies vary from 60 to 480 kHz. The acquisition time is approximately 2 seconds.
The reliability of the measurement is maximum for flat surfaces, with an area of at least 13 mm diameter.
Referent:
Barbara Salvadori barbara.salvadori@cnr.it
